Complete everything at your own risk. You can void the warranty and brick your phone. Do not pull the cable out during this process as it will hurt the bootloader. If you hurt the bootloader you have bricked the phone. It is likely that everything else you can recover from.
**The Return to Stock process will get you back up and running most of the time when you get a bad flash with CWM or have an EXT4 partition problem.
This is necessary to "undo" modding before returning your phone to VZW for warranty purposes or selling. These steps return the phone to stock settings are are valuable for restoring factory setting if a flash has gone haywire.**
After you complete this process you can just take the over the air (OTA) update from Verizon to get the FP1 update.
Read all the way through this post so that you do not miss anything and then watch the Restore Video
I am trying to find a place to host these files. Server space costs which is why the downloads for android stuff is usually slow even when it is a small file. I am working to find a place to host these for free. Let me know what you think.
Click on the download links and then scroll all the way to the bottom. The free download link is on the bottom left of the page.
1. Download stock UNROOTED 2.3.6 EP4 for the Droid Charge.
2. Download IMNUTS PIT file.
3. Follow the guide below with the addition of adding the PIT file at STEP 14 of the tutorial. You need the PIT file to repartition if you've converted to EXT4 from the stock RFS format. When you add the PIT, the Re-Partition box should automatically be checked. It not, Odin will Fail. This is the only difference to the screen shots for flashing a Rom.
4. Complete the process as shown.
Download these:
Odin 1.82- Download
Samsung Drivers- Download
WinRar- Download The trial never stops working. Good program to have on your computer.
Let's begin.......
1. Install Odin
2. Install Samsung Drivers
3. Install WinRar
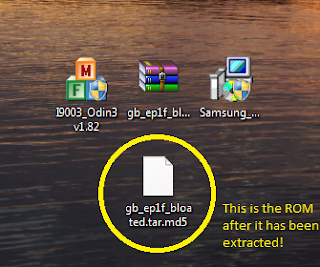
3a. Extract the Rom if it is a zipped file (check this as some do not need extracting)

Right click rar
click "extract here"
OR.. open with winrar and click and drag to desktop
4. There should now be an .md5 file on your desktop
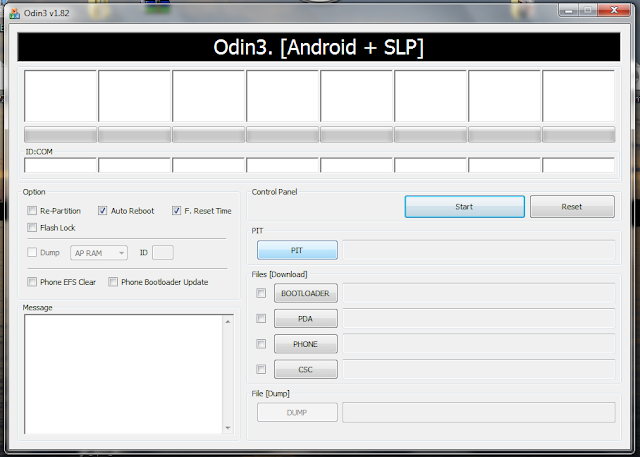
5. Open Odin 1.82
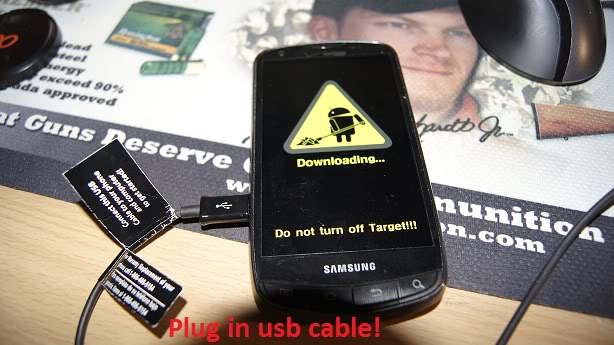
6. Turn OFF your phone
7. Now put your phone in download mode (can be tricky at times)
Volume Down + Tap power for like a second until a yellow triangle appears
HINT: if that is a no go, power down your phone, take out the battery. While holding volume down, plug your usb cable in. Download mode should appear. Put battery back in.
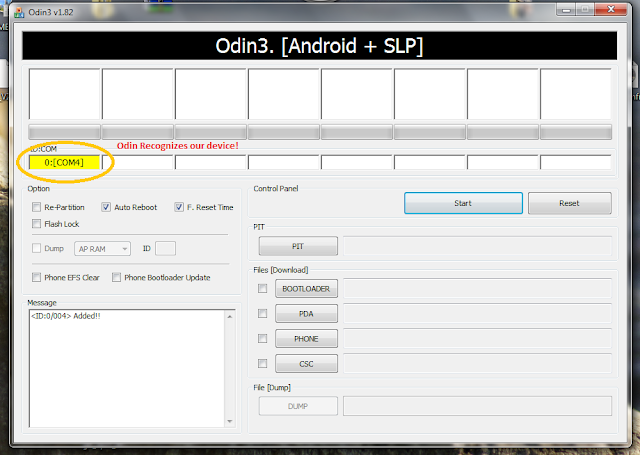
8. Connect to computer via a good usb cable (it is recommended to use the usb at the back of your computer. If flash fails switch to a different port and try again.)
9. First bottom white slot should now be yellow [Comx] indicating Odin recognizes your phone.
10. IMPORTANT: Check PDA and only PDA. Checking phone can result in an unrecoverable Bricked device!!
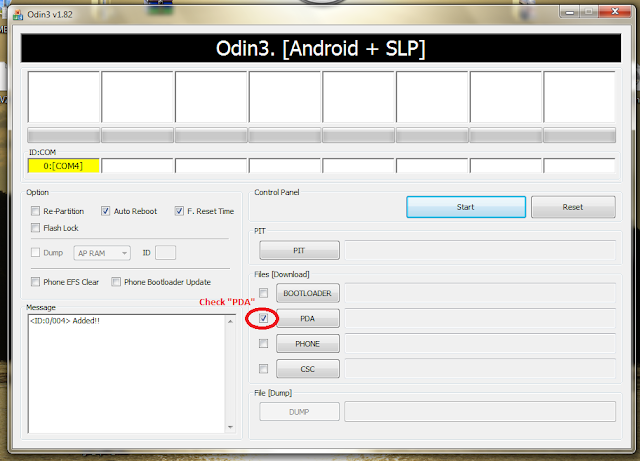
11. Click PDA button
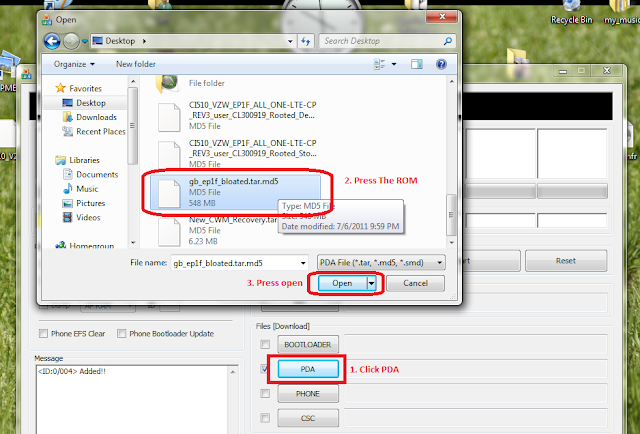
12. Browse to where your ROM is located and select it. If you cant find it you didn't extract it.
13. Double check that you only selected PDA
14. Triple check you only checked PDA
If you are RETURNING TO STOCK this is where you do the additional step of adding the PIT file. Do this the same way you added the .md5 file. Now you will have 2 files on your screen.
When you add the PIT, the Re-Partition box should automatically be checked. It not, check it now or Odin will Fail. This is the only difference to the screen shot for flashing a Rom.
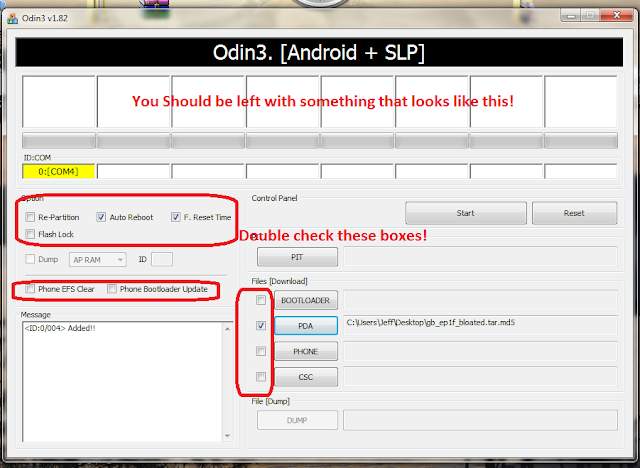
Re-Partition-- Unchecked (If RETURNING TO STOCK this box should be CHECKED)
Flash Lock-- Unchecked
Auto Reboot-- Checked (You can uncheck this box if flashing CWM...saves an extra boot)
F. Reset Time-- Checked
Phone EFS Clear-- Unchecked
Phone Bootloader Update-- Unchecked
Bootloader-- Unchecked
PDA-- Checked
Phone-- Unchecked
CSC-- Unchecked
15. Now click Start button
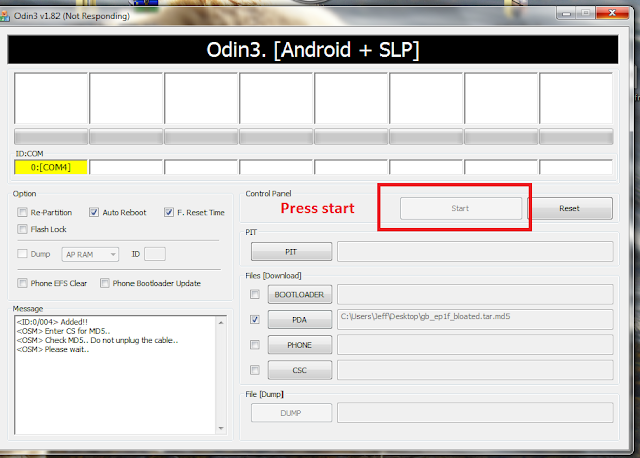
16. WAIT
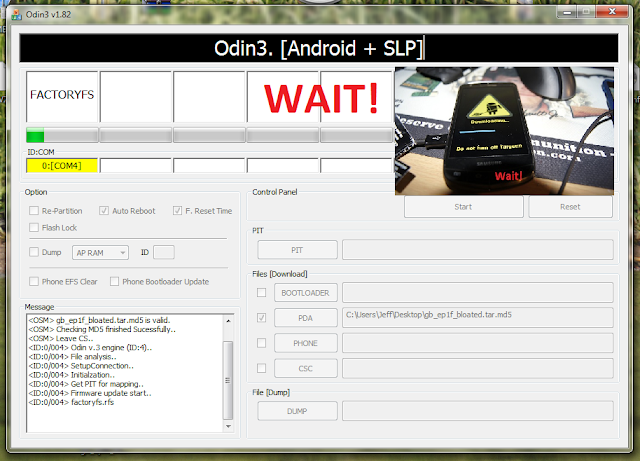
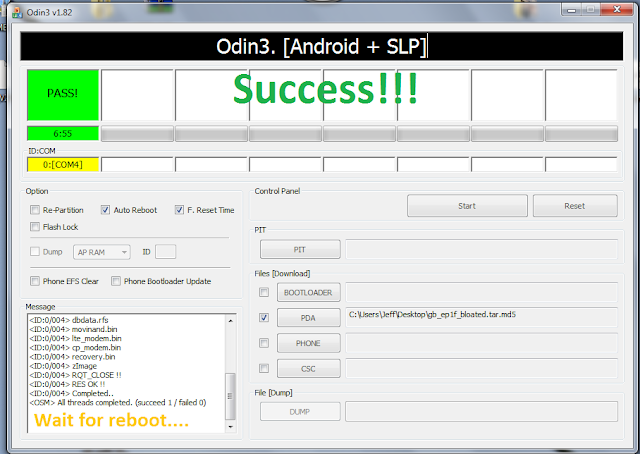
17. Yellow bar should go green and a message should display on the page saying it Passed
Note: If you get a Fail just try it again. Play around with flashing with and without the battery. Make sure you are using the stock battery. If continues to fail re-download the ROM and try again.
18. Let phone reboot.
Congratulations!! You're done!
CREDITS: Thanks to all the Devs!!! If you like their work donate to show your appreciation.
*IMNUTS- created the recovery
*PENTAFIVE - Official GB EP4D
*Other Devs that make great things for our phones
*scarygood536 on xda-developers for the screen shots
I take NO CREDIT for any of the files or links provided.
**The Return to Stock process will get you back up and running most of the time when you get a bad flash with CWM or have an EXT4 partition problem.
This is necessary to "undo" modding before returning your phone to VZW for warranty purposes or selling. These steps return the phone to stock settings are are valuable for restoring factory setting if a flash has gone haywire.**
After you complete this process you can just take the over the air (OTA) update from Verizon to get the FP1 update.
Read all the way through this post so that you do not miss anything and then watch the Restore Video
I am trying to find a place to host these files. Server space costs which is why the downloads for android stuff is usually slow even when it is a small file. I am working to find a place to host these for free. Let me know what you think.
Click on the download links and then scroll all the way to the bottom. The free download link is on the bottom left of the page.
1. Download stock UNROOTED 2.3.6 EP4 for the Droid Charge.
2. Download IMNUTS PIT file.
3. Follow the guide below with the addition of adding the PIT file at STEP 14 of the tutorial. You need the PIT file to repartition if you've converted to EXT4 from the stock RFS format. When you add the PIT, the Re-Partition box should automatically be checked. It not, Odin will Fail. This is the only difference to the screen shots for flashing a Rom.
4. Complete the process as shown.
Download these:
Odin 1.82- Download
Samsung Drivers- Download
WinRar- Download The trial never stops working. Good program to have on your computer.
Let's begin.......
1. Install Odin
2. Install Samsung Drivers
3. Install WinRar
3a. Extract the Rom if it is a zipped file (check this as some do not need extracting)

Right click rar
click "extract here"
OR.. open with winrar and click and drag to desktop
4. There should now be an .md5 file on your desktop

5. Open Odin 1.82

6. Turn OFF your phone
7. Now put your phone in download mode (can be tricky at times)
Volume Down + Tap power for like a second until a yellow triangle appears
HINT: if that is a no go, power down your phone, take out the battery. While holding volume down, plug your usb cable in. Download mode should appear. Put battery back in.
8. Connect to computer via a good usb cable (it is recommended to use the usb at the back of your computer. If flash fails switch to a different port and try again.)

9. First bottom white slot should now be yellow [Comx] indicating Odin recognizes your phone.

10. IMPORTANT: Check PDA and only PDA. Checking phone can result in an unrecoverable Bricked device!!

11. Click PDA button
12. Browse to where your ROM is located and select it. If you cant find it you didn't extract it.

13. Double check that you only selected PDA
14. Triple check you only checked PDA
If you are RETURNING TO STOCK this is where you do the additional step of adding the PIT file. Do this the same way you added the .md5 file. Now you will have 2 files on your screen.
When you add the PIT, the Re-Partition box should automatically be checked. It not, check it now or Odin will Fail. This is the only difference to the screen shot for flashing a Rom.

Re-Partition-- Unchecked (If RETURNING TO STOCK this box should be CHECKED)
Flash Lock-- Unchecked
Auto Reboot-- Checked (You can uncheck this box if flashing CWM...saves an extra boot)
F. Reset Time-- Checked
Phone EFS Clear-- Unchecked
Phone Bootloader Update-- Unchecked
Bootloader-- Unchecked
PDA-- Checked
Phone-- Unchecked
CSC-- Unchecked
15. Now click Start button

16. WAIT

17. Yellow bar should go green and a message should display on the page saying it Passed

Note: If you get a Fail just try it again. Play around with flashing with and without the battery. Make sure you are using the stock battery. If continues to fail re-download the ROM and try again.
18. Let phone reboot.
Congratulations!! You're done!
CREDITS: Thanks to all the Devs!!! If you like their work donate to show your appreciation.
*IMNUTS- created the recovery
*PENTAFIVE - Official GB EP4D
*Other Devs that make great things for our phones
*scarygood536 on xda-developers for the screen shots
I take NO CREDIT for any of the files or links provided.